For those of you wondering why on earth there is yet another post about my daughters' room, and why on earth it is a renovation, I'll enlighten you.
Former owners of our house had pets, and they ruined sections of the bedroom carpets and floorboards.
(Ew, gross, yuck.)
So we've been taking out the old gross carpet, sealing the floorboards, and putting down new carpet.
It was time to do this little bedroom!
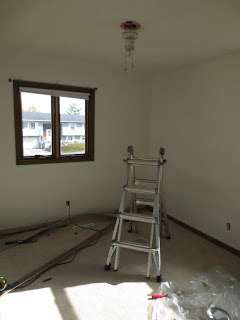
Want sort of a "before" shot?
Poor, drab space:
It's so blah. And so white. The walls needed to warm up but not overpower the small 9'x12' room.
(And I've already explained the carpet.)
Enter a Menards remnant, on sale no less, that fits the room perfectly.
I found a soft gray for the walls that coordinates well with the dark tan carpet.
Step One: Remove the NASTY!
Scrape and scrape to get the old pad off the floor, then get as much dust up as possible.
(Sweep, vacuum, repeat as necessary.)
Then seal the floor.
The Zinsser primer we use stinks so badly we just get it down and seal the door while leaving a window open. It's totally fine the next day. Which is why at this point in the process there are no photos, because helping do this but being pregnant did NOT make me want to stick around any longer than necessary.
Once the carpet was out and the floor sealed it was time to paint! I love this part.
When you paint, prepare well!
Dust the walls, make sure to remove cobwebs. If there was anything hanging up, the walls are sure to be dusty around them. Get the walls clean!

Next, evaluate the damage.
Most people don't know good painting techniques or tricks, which is why I can tell you this room has been blue, gold, hot pink, and white.
I find that leaving the top of the baseboard open for paint at least covers the earlier blunders and helps it blend with the wall rather than just leaving all those ugly spots.
See? Hot pink!
(And seriously, it's way more work to paint around a switchplate than it is to remove it.)
Around the trim I leave a 1/4" space, to even out all those splotches on the trim and make a nice neat line. It's a lot less visually jarring than different paints all over your trim. Just get that tape stuck down well, and in a straight line, please.
Don't rush the prep work. You will save yourself time, and judgement from someone like me who hates a job so poorly done so many times.
(Because your goal in life is avoiding me judging you, right? Ha!)
See? Messy painting. Not enough patience makes a mess.
Cut in those edges. Double check the tape before painting, and don't be frustrated if it takes a few coats to get even coverage. Patience and just being careful and steady will give you a better paint job.
Working around odd, poorly done drywall and mudding is a necessary evil at times.
Here's where I paint the top of the trim:
The gray didn't look too different until it dried. Then there was some excellent comparison.
(NOTE: Painting along the ceiling is pretty simple with a steady hand an a high-quality angled brush. Just used the brush to tap into the groove where the wall and ceiling meet, and then carefully work down from that line to meet where the rollers will put their paint.)
Here is my Studly Helper, practicing his teenage girl face.
And again, the contrast between white and the softness of the gray. Love it!
Totally painted! Happy moment!!!
And you can see here where we primed the floor. (Goodbye, odor from stained floorboards!)
And the tape comes off!
Nice, neat lines.
(Mostly)
Then (drumroll) ----> CARPET!!!
My amazing Husband at work:
This carpet has the pad attached, so unlike standard carpets that require tack strips and stapling down the fragile padding first, this uses an adhesive tape to stay put. Carpet glue around the edge acts in place of the tack strip. It's pretty cool.

I don't know that Scott loved installing it, but I thought it went much faster than the standard carpeting in our bedroom did.
Suddenly, it was more than just snapping pictures and gleefully loving the newness of it.
Suddenly, there was function restored!
The bedroom was done!!
Then there were two little girls, ecstatic to have their room back!
(Because no matter how much you play in the other bedroom, there is something strange about sleeping in that same room for 2 nights.)
(Yes, Miss Lucy has her own big bed. She's doing a great job sleeping in it, too!)
Now, my next favorite part: The finished product.
When all the decorations are back...
...and the Girls are so happy to have their pictures on the wall again...
...and the Mommy and the Daddy are pleased with the final result,
and a job well done,
and effort well put.
(And it will be awesome when those fabulous little pink frames have pictures of the girls in them. Remember that great idea? Yeah, that will get done at some point.)


.JPG)


So lovely, Hannah! :) I especially love the wall of teal + pink decorations. =) I'm sure the girls love their new room! Blessings!
ReplyDelete