Showing posts with label d.i.y.. Show all posts

22 April, 2013

Pinterest Project

 I had a remnant of wax left from a candle.
It was a Bath & Body Works candle, and so the glass holder was nice, and durable.
(And if I spent a bit more money than I usually do on the candle, why not keep a pretty jar that would be perfect for cute odds and ends somewhere?)

Here is the candle:
(Paired with my does-not-photograph-well hand for size comparison.)

I came across an idea on Pinterest for removing wax.
Kim, writing at Yellow Brick Home, shared her method for removing wax from her candles.

Here is my try, using her method:

Pour boiling water into the candle.
The wax will melt and begin floating to the top.
Let the water cool. The wax on top will harden and can be taken out of the jar. (Don't pour the water down the drain until it's completely cool, so the drain doesn't clog with wax!)
 The remaining wax is soft, and easily removed. (I just dug it out with a paper towel.)

 Soap and hot water remove the final residue.
I don't have an after photo...sorry!
But this little jar is squeaky clean and ready to use.

So, success from Pinterest! Yay!

28 October, 2012

Girls' Room (The Renovation)

For those of you wondering why on earth there is yet another post about my daughters' room, and why on earth it is a renovation, I'll enlighten you.
Former owners of our house had pets, and they ruined sections of the bedroom carpets and floorboards. 
(Ew, gross, yuck.)
So we've been taking out the old gross carpet, sealing the floorboards, and putting down new carpet.
It was time to do this little bedroom!

Want sort of a "before" shot?
Poor, drab space:

It's so blah. And so white. The walls needed to warm up but not overpower the small 9'x12' room.
(And I've already explained the carpet.)
Enter a Menards remnant, on sale no less, that fits the room perfectly.
I found a soft gray for the walls that coordinates well with the dark tan carpet.

Step One: Remove the NASTY!
Scrape and scrape to get the old pad off the floor, then get as much dust up as possible.
(Sweep, vacuum, repeat as necessary.)
Then seal the floor. 
The Zinsser primer we use stinks so badly we just get it down and seal the door while leaving a window open. It's totally fine the next day. Which is why at this point in the process there are no photos, because helping do this but being pregnant did NOT make me want to stick around any longer than necessary.

Once the carpet was out and the floor sealed it was time to paint! I love this part.
When you paint, prepare well!
Dust the walls, make sure to remove cobwebs. If there was anything hanging up, the walls are sure to be dusty around them. Get the walls clean!

Next, evaluate the damage. 
Most people don't know good painting techniques or tricks, which is why I can tell you this room has been blue, gold, hot pink, and white.
 
So many messy spots.
I find that leaving the top of the baseboard open for paint at least covers the earlier blunders and helps it blend with the wall rather than just leaving all those ugly spots.

See? Hot pink!
(And seriously, it's way more work to paint around a switchplate than it is to remove it.)
 Around the trim I leave a 1/4" space, to even out all those splotches on the trim and make a nice neat line. It's a lot less visually jarring than different paints all over your trim. Just get that tape stuck down well, and in a straight line, please.

Don't rush the prep work. You will save yourself time, and judgement from someone like me who hates a job so poorly done so many times.
(Because your goal in life is avoiding me judging you, right? Ha!) 

 See? Messy painting. Not enough patience makes a mess.
Cut in those edges. Double check the tape before painting, and don't be frustrated if it takes a few coats to get even coverage. Patience and just being careful and steady will give you a better paint job.

Working around odd, poorly done drywall and mudding is a necessary evil at times. 

 Here's where I paint the top of the trim:

The gray didn't look too different until it dried. Then there was some excellent comparison.  
(NOTE: Painting along the ceiling is pretty simple with a steady hand an a high-quality angled brush. Just used the brush to tap into the groove where the wall and ceiling meet, and then carefully work down from that line to meet where the rollers will put their paint.)

Here is my Studly Helper, practicing his teenage girl face.

And again, the contrast between white and the softness of the gray. Love it!

Totally painted! Happy moment!!!
And you can see here where we primed the floor. (Goodbye, odor from stained floorboards!)

And the tape comes off!
Nice, neat lines.
 (Mostly)
Then (drumroll) ----> CARPET!!!

My amazing Husband at work:
 This carpet has the pad attached, so unlike standard carpets that require tack strips and stapling down the fragile padding first, this uses an adhesive tape to stay put. Carpet glue around the edge acts in place of the tack strip. It's pretty cool. 


I don't know that Scott loved installing it, but I thought it went much faster than the standard carpeting in our bedroom did. 

 Suddenly, it was more than just snapping pictures and gleefully loving the newness of it.
Suddenly, there was function restored!
The bedroom was done!!

 Then there were two little girls, ecstatic to have their room back! 
(Because no matter how much you play in the other bedroom, there is something strange about sleeping in that same room for 2 nights.)


And we got everything put back in just in time for bedtime.
(Yes, Miss Lucy has her own big bed. She's doing a great job sleeping in it, too!)

Now, my next favorite part: The finished product.
When all the decorations are back...
 ...and the Girls are so happy to have their pictures on the wall again...

...and the Mommy and the Daddy are pleased with the final result,
and a job well done, 
and effort well put. 

(And it will be awesome when those fabulous little pink frames have pictures of the girls in them. Remember that great idea? Yeah, that will get done at some point.)



15 March, 2012

White

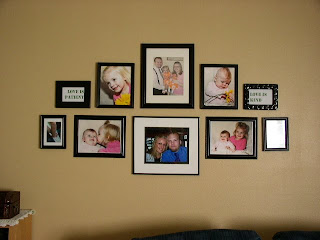
All my frames have been black. It didn't look bad, it just slowly became the opposite of the casual, airy, light feeling I want in my home. The walls are a very warm, sandy color. I don't see them getting painted in the near future, so my goal is to accent in ways that bring light into the very warm space we have upstairs.
I painted the end tables and the wall shelves white, and then sat and stared at my wall of photos and debated whether or not I should paint all those frames white as well.
Finally I did, and I'm so glad!
(I ran out of paint, so eventually I will get my last 3 frames done upstairs and it will be perfect.)

Here is before:
And after:
And some other frames that aren't easy to include in one big photo but were also painted:


I love that I now see what is in the frames rather than the frames themselves. I love how the white glows in the dark evenings with the lamps on. It's much, much better. :-)

16 February, 2010

DIY Day!

I'm linking up...

The fabulous Couch Renovation is on Kimba's site.

Check it out!

Kimba's DIY Day is so fun!

25 January, 2010

The Great Couch Renovation

(Check out tons of other fun renovations at Kimba's site, on DIY Tuesday!)

Here is our couch. Pretty, at least pretty back in 1960. Yet it is a hide-a-bed, which provides us with guest space, and it is definitely serviceable and fits our little apartment well.
However, it doesn't match the rest of the room and so my first idea was to get a King size flat sheet, put that over it, tuck it in, and make it work.

Ugh. So tacky.

So the flat sheet sat dormant, in a little corner, for 6 months.

Two days ago I decided that enough was enough and I was going to use the sheet one way or another. Months of mulling over how to cover the massive floral velvety print and keep the hide-a-bed accessible led to a big culmination. It took 12(+/-) hours, 3 days, some sewing, some furniture tacks, some brainpower, lots of patience, hiding the rough edges, but it completely paid off! Here's what went down over in Apartment 101:

I cut off the end of the sheet, and tacked it to the front, complete with pleat (which adds a nice touch I think).
It was a little tricky to pin it up far enough but give clearance to pull out the bed. As I found out, this was the easiest part.
The cushions were pretty easy...not necessarily pretty underneath, especially to fit around the end sticking out. I had no idea what I was doing, so I patched together a pocket for the end, and then made basic pocket corners. An elastic gather holds it in place.
Next were the sides. Looking back, I could have attached them to the removable part of this, but I chose not to. This will lead to figuring out a way to nicely cover the arms.
One square of fabric, tucked, tacked and hemmed.
I needed one King sheet for the cushions, arms, and front, and I used another for the back of the couch.
This was tricky. It involved tugging, folding, pinning, more tugging, straightening, more pinning, and then carefully pulling the whole thing off to stitch seams. They worked on the first try! *Huge sigh of relief*

Up next, after the back was in place, was to attach decorative ties. I like decorative, and I wanted that cute extra touch. It also helps keep things in place.
This is probably my favorite part of the entire couch.
The back is completely covered.

And...*gasp*...you can see where we hide our speaker cords!

Now, drumroll please! After all that process, it was completely worth it! I took our steam iron to it to get out the majority of the creases. (No, I don't wash or iron before I sew, and I know that's probably naughty of me.)

Anyway...

TADA!

I love it.

Cost:
2 King size flat sheets, Mainstays from Walmart: $28.00
2 pkg. furniture tacks from Walmart: $2.34
Elastic cording from Walmart: $1.17
Grand Total: $34.41

(I'll be expecting my promo check from Walmart in the mail...)